The Bad Avenue Cheese Press - Lot 3
an Oak and Steel Classic
Produced by Bad Avenue Tools
Updated 10 March 2021
No Longer Available On

Last Poduction 2016.
A special thanks to the buyers!
Enjoy many decades of service from your press. This information is presented for cheesemakers
interested in the constuction details of this
press and the cheese pressing information
presented at the end of this page.
badavenuetools@batguano.com
(cheese mold, drip tray, and scale are not included)
 |
Bad Avenue Cheese Press
by Bad Avenue Tools |
The Bad Avenue Cheese Press was designed, developed and produced by a cheese maker, aerospace engineer and woodworker. It's an extremely strong and durable solid oak, purpleheart and steel cheese press that will last a life time. I developed the cheese press in 2012 because, as a new cheese maker, I couldn't find one that fit my cheese making performance requirements. I wanted a professional press that could provide accurate pressures to different sized cheese molds. The press piston can produce more than the 250 lbs of force required (3.14 psi) for a final cheddar pressing using a 10 inch cheese mold. 50% of the total weight of the press is steel. Each press is totally hand made and hand finished. All presses are serialized and branded on the lower surface of the Base Assembly. The presses in this lot are numbered from # 30 to # 44. The previous lots were sold in the Western US in 2014. This is the first time the press has been available on ebay. The press steel structures (welds, steel failure, threads, piston end assembly and "T" bar assembly) are guaranteed for ten years but most likely they will last forever.
Initially, two prototypes were built and tested. The design and testing of the third and final press version required 15 months. This included producing over 300 lbs of cheddar and other cheeses. The ability to repeat accurate press pressures is one important key to attaining quality cheese product. More information is presented on the design, performance, setup, calculating pressures and converting pressing forces required for different sized molds.
What's in the box?
Cheese Press Base Assembly
Top Bar and "T" handle / piston assembly
3" Cheese Puck - Piston to mold follower interface
2 vertical threaded 3/8 inch guide bars (spacers and hardware installed)
2 Bad Avenue Tools key tags and 2 spare washers(cheese mold, drip tray, and analog scale are not
included with the press)
Design Details
 | | Encased "T" Handle |
|---|
This press was developed to support home and small business cheese makers. The press structure contains heavy 1/4" thick steel

| | Upper Bar Steel |
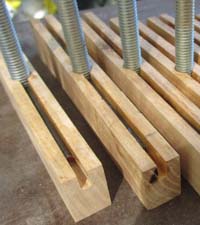
bars in the Top Bar Assembly (encased) and the Base Assembly (embedded) that make it possible to produce over 250 lbs of force through the center piston to the cheese mold follower. The oak "T" handle has an internal heavy steel cross rod integrated into the top 1/2" threaded press rod. The steel assembly is bonded and encased in the wood top handle and trimmed with purpleheart. The heavy duty steel "T" handle provides the high torque required to power the press.

|
| Standard 7 7/8" Mold |
|---|
The press is designed around the standard 7-7/8"(W) x 6"(H) Large Hard Cheese Mold and the readily available and affordable "analog bath scale". Also called a "analog dial scale". A digital scale will not work for this application.

|
| Press Steel |
I tested several methods of measuring force at the piston and the basic "analog bath scale" turned out to be the most accurate, most reliable and least expensive. A standard cheddar recipe final press in an 8" (4-7 lb cheese) mold requires 3.14 psi (160 lbs). 3.14 psi on a 4.5"(W) x 5"(H) (2 lb) Small Hard Cheese Mold requires 50 lbs. This press supports all the available commercial mold sizes from 4 to 10 inches. The press is also very useful at lower pressure pressings of softer cheeses like Gouda, Queso Fresco, Swiss and other semi-hard varieties. More information follows on using The Pressure Chart to convert pressing weights (lbs) and cheese follower pressures (psi) between multiple mold follower sizes.  | | Storage Ring |
High performance and durability were the primary design goals, but it also had to look great in the kitchen and represent

|
| Top Bar steel |
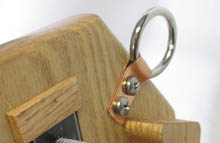
my best steel and woodworking skills. The working steel structure of the press is hidden below and inside solid oak, trimmed and inlayed with purpleheart. The steel ring is provided to hang the press in the kitchen or pantry. By design, all the heavy pressing forces are absorbed by the steel so the oak is not stressed, flexed or fatigued. The press is produced using a series of jigs and custom tooling that lower production time, increase and standardize quality, size and shape, make parts interchangeable and keep all the assemblies and presses within a 2 mm tolerance. Each press build requires 80 separate operations to fabricate and finish. They are produced in lots of 15. Each press is finished with seven coats of hand-rubbed satin finish polyurethane.
The vertical guide rods are 11.25" apart to accomodate use of multiple models of weight scales. Most of the small spring / analog weight scales are 10.5" square or smaller.I use a 9" x 9" scale.

|
| Base Steel |
Digital scales will not work. I tested 7 different analog scales with fixed weights and found the accuracy to be within 1%. These scales usually cost $7 - $15. You can find them on line, hardware stores and Walmart. Four scales: Scale 1, Scale 2, Scale 3, and Scale 4.
My original scale works well after 3 years. The vertical guide rods are placed one inch closer to one edge of the press to accomodate the drip

|
| 3" Cheese Pucks |
tray to drain whey into a container placed next to the press.The walnut dot in the Base Assembly marks the center of the press and the position of the piston to aid the stacking of the scale, drip tray and mold.
The vertical press bars use plastic spacer tubes to keep the bar and piston assembly off the base during storage. The spacers are left on and due to their size, do not interfere with cheese pressing. The purpose of the "cheese puck", included with the press, is to interface the piston to the

|
| Base Spacer Detail |
mold follower. The 3" maple puck fits the center ring of the standard 4.5" and 8" cheese molds. This helps center the piston and distributes the pressure to keep the follower aligned. A one inch depression on the opposite side of the puck interfaces with the piston end. The only assembly required is the installation of the two vertical threaded 3/8" guide rods. Instructions and photos follow.
Bad Avenue Cheese Press Specifications
Construction - Oak, Purpleheart, Maple, Walnut and Steel
Overall size (in) - 15.5 (w) x 9 (d) x 12.5 (h)
Base size (in) - 15.5 x 9 x 1.5
Top bar size (in) - 15.5 x 2 x 1.25
Vertical top bar guide 12" threaded rods 3/8x16 (2)
Space between vertical threaded guide rods - 11.25"
Total weight - 7 lbs 5 oz
Steel bars total weight - 2 lb 3 oz
Steel structures total weight - 3 lb 11 oz
Base weight - 4 lbs 8 oz
Top bar / T handle assembly - 2 lbs 13 oz
T handle 8.5" threaded rod 1/2" x 13 thread
T handle size (in) - 8.5 x 1.25 x 0.75
Top bar incased steel (in) - 13.5 x 1.5 x 0.25 = 1 lb 4 oz
Base Assembly embedded steel (in) - 13.5 x 1 x 0.25 = 15 oz
Cheese puck (in) - 3 x 0.75, Maple

|
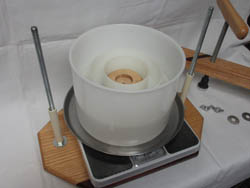
| 8" mold, puck, drip tray, spacer pad & scale |
Additional Equipment List
You will need a few items before you start using the press.
1) Analog dial bath scale. Covered previously.
2) Spacer pad. You may need a spacer pad between the scale and the drip pan if the scale window is not flush with the surface of the scale. I use a scrap plastic cutting board.
3) Drip Tray that will fit the largest mold you might use. Drip trays are available on cheese supply sites at a high cost. I recommend purchasing a set of stainless "Range Kleen 4-piece Burner Covers". $11 gets you two 10" and two 8" drip trays. Just drill a 3/8" hole near the edge and you are ready to go.
4) Cheese mold. I have used the 4.5" mold, but more frequently I use the 8" mold. Because of the time involved in cheesemaking, I prefer to make 4 or 6 lb cheeses using the 8" mold. The press was designed to produce the pressures required for molds from 4" to 10". The 3" Cheese Puck that is delivered with the press interfaces with both the standard 4.5" and 8" molds.

|
| Step 4 |
Setup and assembly:
Step 1 Unpack the vertical guides.
Step 2 Remove nut, lock washer and first washer from red end.
Step 3 Insert each the shaft through the base.
Step 4 Install washer, lock washer and nut on the shaft. Tighten with two 9/16 wrenches. Keep the red dot flush with the nut.
Using the press: (with an 8" Cheese mold)

|
| Steps 1-4 |
Step 1 Remove the top bar assembly.
Step 2 Place the scale with the weight dial window over the edge with the purpleheart edge.
Step 3 Add the spacer pad if needed to keep the drip tray from touching the scale window.
Step 4 Add the drip tray with the drain hole over the edge of the side of the press with no trim. The "narrow side" of the press base.
Step 5 Add the 8" mold. Add the cheese curds to the cheese cloth lined mold. Fold the cloth edges into the mold.
 |
| Steps 5-7 |
Step 6 Place the follower into the mold.
Step 7 Place the "Cheese Puck" into the center ring of the follower. Add the top bar assembly.
 |
| Steps 8-11 |
|---|
Step 8 Retract the piston until the bar rests on the top surface of the mold.
Step 9 Place the washers on the vertical guide rods.
Step 10 Install the wing nuts and turn until they are snug and the stack is secured.
Step 11 The last and most important step before pressing is to "zero" the scale. Turn the small adjustment wheel on the scale until the weight reads zero.
Now you are ready to apply force to the cheese.
Converting Pressures & Changing Cheese Molds
Pressure (psi) and pressing pounds are two different things. Many online cheese forums cause confusion on this subject. Pounds (lbs) of force are applied by the piston to the puck and cheese follower. The pounds of force are spread out across the area of the round cheese follower. The force on the cheese is measured in psi (pounds per square inch) exerted by the follower in the cheese.
Breaking the code: Most cheese recipes provide pressing guidance in "pounds" only. The majority of those recipes are for 2 gallon batches. A 2 gallon batch make 2 lbs of cheese and that means they use the 2 lb 4.5" cheese mold. If you are completing the recipe with the 4.5" mold, press until the scale reads the recipe's recommended pounds of force. If you know the recipe "force" and the mold size you can back out the resulting "psi" by using the "The Pressure Conversion Table" and then convert to the required pressing force of another sized cheese mold. If your goal is a 4 gallon, 4 lb cheese, scale up the ingrediants and increase the pressing force (pounds) and resulting higher psi required for the 8" mold. But how much? There are couple ways to do this but let's keep it simple. Refer to The Pressure Conversion Table. Let's use one of Ricki Carroll's Recipes from the book "Home Cheesemaking Making" and her Moosletter. Ricki's Traditional Cheddar recipe (pg 108) calls for 3 timed pressings . 10 lbs(15min), 40 lbs(12 hrs) and 50 lbs(24 hrs). You will have to scale up the recipe ingredients and determine the new pressing "pounds" based on the larger 8" mold size.
First: Determine the 4.5" mold (15.9 sq in follower) recipe's "psi" values using the chart.
Step 1) Use the 1st (press weights) and 3rd (4.5" follower diameter) columns of the chart
Step 2) Read down Column 1 to 10 lbs. Go right to column 3 - Record 0.63 psi.
Step 3) Read down Column 1 to 40 lbs. Go right to column 3 - Record 2.51 psi.
Step 4) Read down Column 1 to 50 lbs. Go right to column 3 - Record 3.14 psi.
Next: Use the psi values to convert back to "pounds" required for the 8" mold (50.3 sq in follower)
Step 5) Use Column 11 of the chart (8" follower diameter)
Step 6) Read down Column 11 to the cell that reads 0.63 (0.60 close enough). Go left to Column 1 - Record 30 lbs.
Step 7) Read down Column 11 to the cell that reads 2.51 (between 2.39 & 2.59). Go left to Column 1 - Record 125 lbs.
Note: You have to interpolate if the value you are looking for is between two rows. Just guesstimate. Looks like about halfway between 2.39 psi and 2.59 psi = 125 lbs.
Step 8) Read down Column 11 to the cell that reads 3.14 (3.18 is close enough). Go left to Column 1 - Record 160 lbs.
Now we know that the 50 lb force used on the 4.5 in mold requires 160 lbs on the 8 in mold to produce the required 3.14 psi. A Big Cheese: Wisconsin cheesemaker, Hennings, sells a 48 inch wide /1000 lb cheddar cheese. The 48" wide cheese (1809 sq inch follower area) requires 5,690 lbs pressing force to produce 3.14 psi for the final pressing. The bigger the mold the larger the follower area . The larger the area the greater the force that must be applied to attain the same psi of the cheese in the smaller mold. Psi at the cheese surface is what really matters. Very old recipes use the same basic psi numbers that modern recipes use. Same proven chemistry. There is much more to cheese pressing than this one example. There are many cheddar recipes with different pressing schedules. Read as many cheese books and articles as you can. There is always more to learn about this edible science.
Cheese Books
Home Cheese Making:Recipes for 75 Homemade Cheeses, 3rd Edition, Ricki Carrol. The best book to start with and return to often.
Cheese Making: A Book for Practical Cheesemakers, Factory Patrons, Agricultural Colleges and Dairy Schools, 1918, John L. Sammis.Free ebook or pdf file download at archive.org. This is an excellent source of useful cheese information and background.
Artisan Cheese making at Home, Mary Karlin
The Joy of Cheesemaking, 2011, Jody M. Farnham and Marc Druart
Mastering Artisan Cheesemaking, 2012, Gianaclis Caldwell
Visitor
|


